

Brazilian Jiu-Jitsu (BJJ) is a martial art where technical prowess triumphs over brute strength. One of its most iconic submissions is the triangle choke. This powerful move can end matches in seconds when executed correctly. Learning how to execute a proper BJJ triangle choke setup is essential for practitioners who want to level up their ground game.
Understanding the Triangle Choke
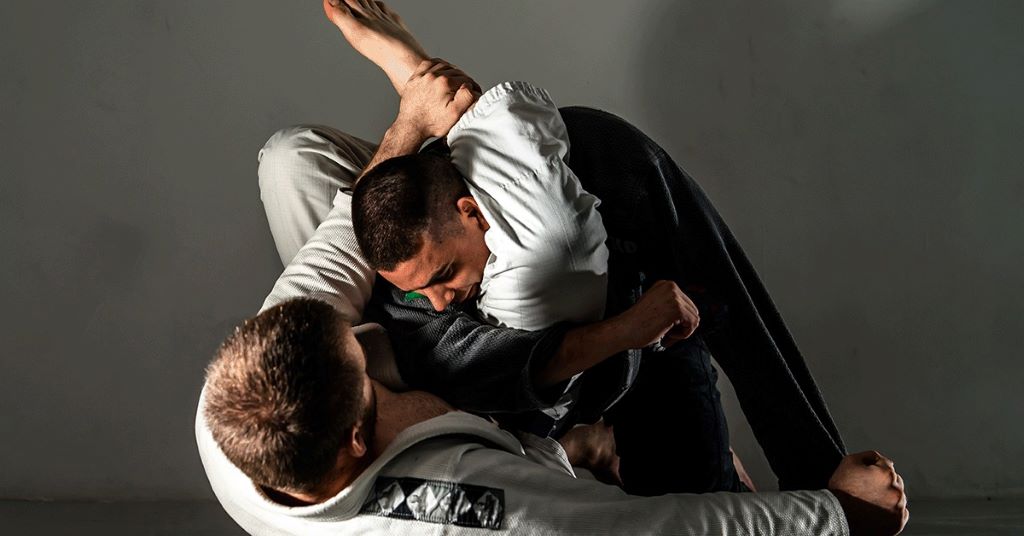
The triangle choke works by encircling the opponent’s neck and one arm with your legs, cutting off blood flow to the brain. According to a study by BJJ Heroes, over 12% of all BJJ competition submissions are triangle chokes. It remains one of the highest-percentage moves across all belt levels.
Logic dictates that a move so frequently successful must have perfect setups. Sloppy setups allow opponents to escape or counter, wasting precious energy. Every movement toward the choke must be precise, calculated, and controlled.
Fundamental Mechanics Behind a Strong Triangle Choke
You must first understand the mechanics before you can master execution. The triangle choke targets the carotid arteries, using the thigh against one side of the neck and the opponent’s trapped shoulder against the other.
Clinical research (American Journal of Sports Medicine) confirms that effective blood chokes cause unconsciousness within 6-10 seconds. Precision is non-negotiable.
Key mechanical principles include:
- Correct angle: You must shift to a perpendicular angle relative to your opponent.
- Leg placement: The knee of the choking leg must press tightly across the back of the opponent’s neck.
- Locked figure-four: The ankle of your choking leg must sit under the knee of the opposite leg.
Ignoring any of these principles significantly reduces the choke’s effectiveness.
Step-by-Step Breakdown: How to Execute a Proper BJJ Triangle Choke Setup
-
Control the Posture
Breaking your opponent’s posture is the first step. Without posture control, a triangle is nearly impossible. Use your legs actively, pulling your opponent down with your knees while controlling their head and arm.
World Champion André Galvão advises always fighting for posture breaks before initiating submissions. Posture creates defensive layers for your opponent; removing it opens submission opportunities.
-
Isolate One Arm
You must isolate one arm while leaving the other exposed. This separation creates the critical setup needed for the triangle. Techniques vary, but simple setups include:
- Wrist control with same-side grip
- Overhook and underhook variations
- Arm drags
Marcus “Buchecha” Almeida emphasizes wrist control, saying: “Controlling the wrist prevents frames and blocks the guard pass too.”
-
Shoot the Triangle
Once the arm is isolated, launch the leg of your choking side over the opponent’s shoulder. Lock the opponent’s posture down immediately. Key points to focus on:
- Flex your toes back to engage your hamstrings and calves.
- Use your arms to pull the opponent’s head down while adjusting your angle.
- Swing your hips and rotate if needed to get the angle right.
-
Lock the Figure-Four
You must lock your legs in a tight figure-four. Hook the foot of your choking leg under the back of your opposite knee. Pull your shin down while squeezing your knees together tightly.
Dean Lister, a legendary BJJ black belt, notes that many chokes fail because of loose legs, not lack of flexibility. Always engage your legs with full tension.
-
Final Adjustment and Finish
Pull the opponent’s head down. Slightly lift your hips to drive pressure through your opponent’s carotid arteries. Squeeze tightly with your legs and keep everything compact.
You’ll often need micro-adjustments. Never rush; patience and tension will force the tap.
Expert Professional Tips to Enhance Your Triangle Choke Setup
- Use your core: Don’t rely on your legs alone; use your abdominal muscles to assist in posture control.
- Angle, angle, angle: Always pivot out perpendicular to maximize pressure across the neck.
- Adjust before you finish: If the triangle feels loose, open slightly, adjust, then re-lock tighter.
- Control the trapped arm: Pin the opponent’s trapped arm across their body to seal the choke faster.
- Drill with intention: Spend dedicated time drilling just the setup phase under different resistance levels.
John Danaher highlights that “most submissions are lost in the setup, not the finish.” Master the setup, and you’ll finish with ease.
Featured Snippet
How do you setup a perfect triangle choke in BJJ?
Setting up a perfect triangle choke starts with breaking your opponent’s posture. Pull them forward aggressively while controlling their head and arm. Next, isolate one arm by controlling their wrist or overhooking. Once the arm is trapped, swiftly shoot your leg over their shoulder while maintaining head control.
Ensure your leg placement is high on their back. Angle your body perpendicular to theirs, not square. This angle maximizes the blood choke effect on the carotid arteries. Lock your ankle under the opposite knee firmly to create a tight figure-four.
Before squeezing, make sure the trapped arm is across your body. Pull the opponent’s head down as you squeeze with your legs. Minor adjustments, like hip lifts or foot repositions, may be necessary for optimal pressure. Drilling with proper posture control and sharp angle movements will sharpen your triangle choke dramatically.
Top black belts consistently stress the importance of patience and tightness during the triangle setup. Precision beats speed every time.
Examples of Perfect Triangle Setups in Competition
- Demian Maia vs. Jason MacDonald (UFC 87): Clinical posture control and angle change led to a textbook triangle finish.
- Kron Gracie at ADCC 2013: Kron used precise setups and patience to secure multiple triangle wins.
- Mackenzie Dern at IBJJF Worlds: Dern combined slick transitions and feints to isolate arms easily for triangles.
These examples underline that the triangle is not just about speed but about superior setup fundamentals.
FAQs:
Q1: How can I make my triangle choke tighter?
Squeeze your knees, lift your hips, and adjust your angle perpendicular to your opponent.
Q2: What’s the biggest mistake beginners make?
Failing to control the posture and rushing the setup.
Q3: Can smaller practitioners successfully use the triangle choke?
Absolutely. Proper technique overcomes size disadvantages.
Q4: Should I pull the head or push the arm first?
Pull the head while adjusting the trapped arm across for maximum pressure.
Q5: How do I prevent opponents from standing up during setup?
Maintain constant head and arm control, and keep your hips active.
Q6: What’s a good drill to improve my triangle setups?
Drill arm isolations and angle shifts repeatedly with a cooperative partner.
Q7: Is flexibility important for triangles?
It helps but isn’t essential. Correct body mechanics and positioning are more critical.
Final Thoughts
Mastering how to execute a proper BJJ triangle choke setup requires deliberate practice, technical precision, and unwavering attention to detail. Every successful triangle shares core elements: posture control, arm isolation, body angle, and tight locks. Experts agree — a beautiful triangle isn’t flashy; it’s efficient, smooth, and inevitable.
Drill the setup daily. Seek feedback from coaches. Analyze high-level matches. With commitment, your triangle choke will become a submission threat feared across the mats.
Read More: The History of Longboarding vs Skateboarding: A Thrilling Journey Through Time